By: Team ConTAct Since: Aug 2018 Licence: MIT
- 1. Introduction
- 2. Quick Start
- 3. Features
- 3.1. Viewing help :
help - 3.2. Adding a student:
add - 3.3. Listing all students :
list - 3.4. Emailing a student:
email - 3.5. Editing a student :
edit - 3.6. Marking attendance:
attendance - 3.7. Graph Students:
graph - 3.8. Schedule events:
schedule - 3.9. Cancel event:
cancel - 3.10. Locating students by name/tag:
find - 3.11. Group:
group - 3.12. Tag Students:
tag - 3.13. Deleting a student :
delete - 3.14. Selecting a student :
select - 3.15. Listing entered commands :
history - 3.16. Undoing previous command :
undo - 3.17. Redoing the previously undone command :
redo - 3.18. Clearing all entries :
clear - 3.19. Exiting the program :
exit - 3.20. Saving the data
- 3.1. Viewing help :
- 4. FAQ
- 5. Command Summary
1. Introduction
ConTAct is an application for teaching assistants who prefer to use a desktop app for managing students. More importantly, ConTAct is optimized for those who prefer to work with a Command Line Interface (CLI) while still having the benefits of a Graphical User Interface (GUI). If you can type fast, ConTAct can get your student management tasks done faster than traditional GUI apps. Interested? Jump to the Section 2, “Quick Start” to get started. Enjoy!
2. Quick Start
-
Ensure you have Java version
9or later installed in your Computer. -
Download the latest
conTAct.jarhere. -
Copy the file to the folder you want to use as the home folder for your ConTAct.
-
Double-click the file to start the app. The GUI should appear in a few seconds.
-
Type the command in the command box and press Enter to execute it.
e.g. typinghelpand pressing Enter will open the help window. -
Some example commands you can try:
-
list: lists all contacts -
addn/John Doe sn/A98765432 e/johnd@example.com f/School of Computing: adds a contact namedJohn Doeto the Address Book. -
delete3: deletes the 3rd contact shown in the current list -
exit: exits the app
-
-
Refer to Section 3, “Features” for details of each command.
3. Features
Command Format
-
Words in
UPPER_CASEare the parameters to be supplied by the user e.g. inadd n/NAME,NAMEis a parameter which can be used asadd n/John Doe. -
Items in square brackets are optional e.g
n/NAME [t/TAG]can be used asn/John Doe t/friendor asn/John Doe. -
Items with
… after them can be used multiple times including zero times e.g.[t/TAG]…can be used ast/friend,t/friend t/familyetc. -
Parameters can be in any order e.g. if the command specifies
n/NAME sn/STUDENT_NUMBER,sn/STUDENT_NUMBER n/NAMEis also acceptable.
3.1. Viewing help : help
Format: help
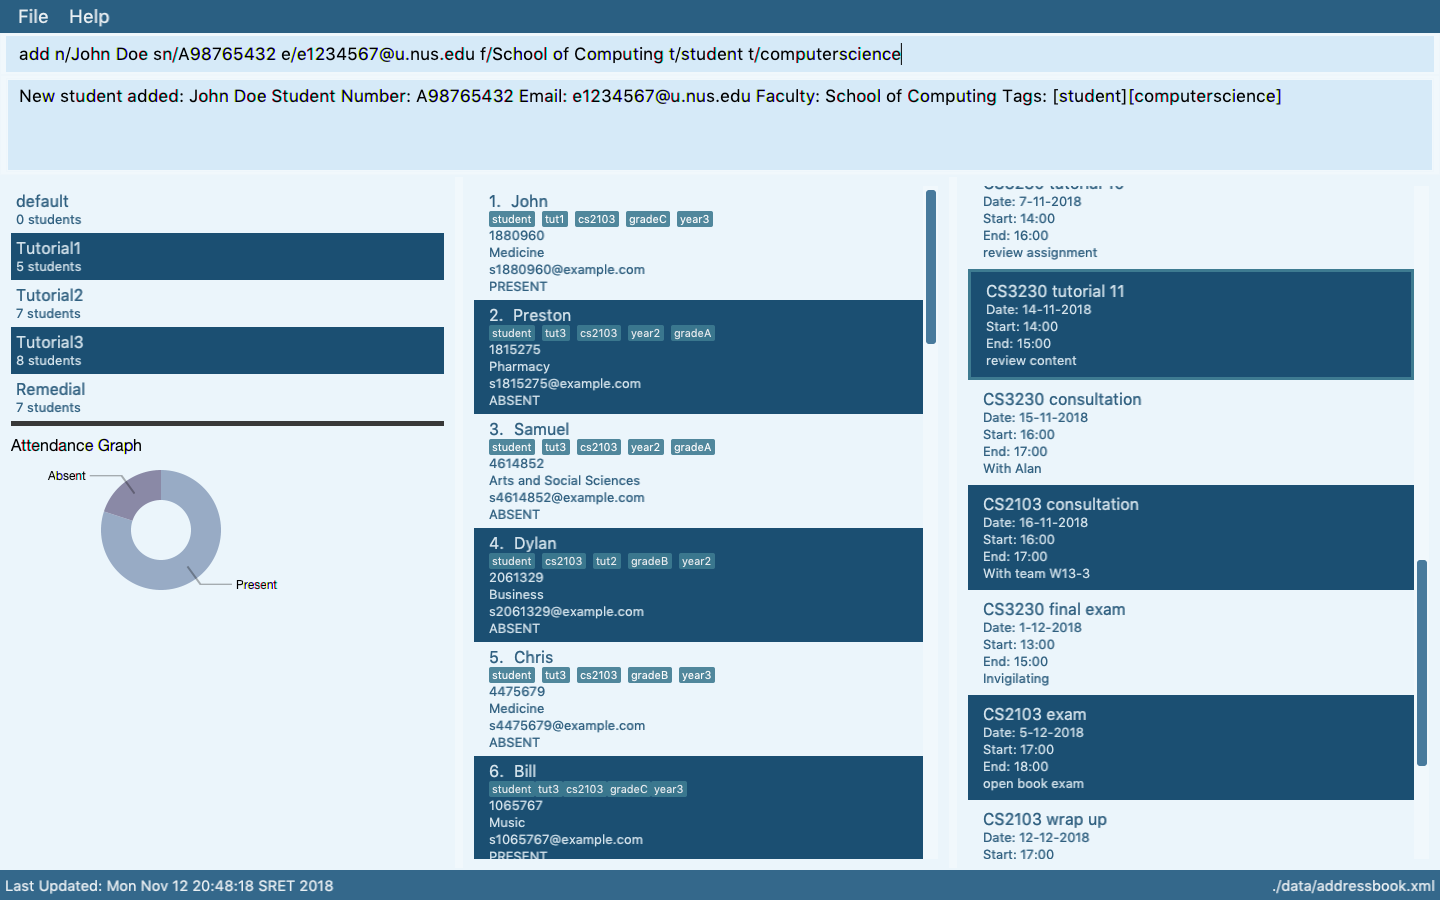
3.2. Adding a student: add
Adds a student to the address book
Format: add n/NAME sn/STUDENT_NUMBER e/EMAIL f/FACULTY [t/TAG]…
| A student can have any number of tags (including 0) |
Examples:
-
add n/Damith Rajapakse sn/A98765432 e/johnd@example.com f/School of Computing -
add n/Bob Ross t/student e/betsycrowe@example.com f/Faculty of Science sn/U1234567 t/physics
3.3. Listing all students : list
Shows a list of all students in the address book.
Format: list
3.4. Emailing a student: email
Allows the user to email a specific student.
Format: email INDEX s/SUBJECT b/BODY
Examples:
-
email 2 s/Attendance Problem b/Your attendance is poor. Is there a problem?
This gathers the email address of the student at index 2, and sets the subject and body respectively. It then asks the user for permission to send the email on their behalf and once the user consents, it sends the email.
3.5. Editing a student : edit
Edits an existing student in the address book.
Format: edit INDEX [n/NAME] [sn/STUDENT_NUMBER] [e/EMAIL] [f/FACULTY] [t/TAG]…
Examples:
-
edit 1 sn/A91234567 e/johndoe@example.com
Edits the student number and email address of the 1st student to beA91234567andjohndoe@example.comrespectively. -
edit 2 n/Betsy Crower t/
Edits the name of the 2nd student to beBetsy Crowerand clears all existing tags.
3.6. Marking attendance: attendance
Allows the user to mark the attendance of students using the index number as well as group name.
Format: attendance INDEX at/ATTENDANCE or attendance g/GROUP_NAME at/ATTENDANCE
-
The attendance marking can be done individually, by using the index number of the student.
-
The user can also collectively mark the attendance by specifying the
group. Then, the user can update the attendance of the students who do not follow the majority specifically.-
The group must exist for the user to update the attendance of the group. If the group does not exist, the user needs to create the required group first. See
groupfeature on how to create a group of students.
-
-
The user can update the attendance of the student/students who are absent as 'absent' or '0' and who are present as 'present' or '1' (any other value updates the attendance to undefined).
-
The existing attendance of the student will be overwritten by the user input values.
Examples:
-
attendance 1 at/present
Marks the attendance of the student with index number 1 as present. -
attendance 3 at/0
Marks the attendance of the student with index number 3 as absent. -
attendance g/tutorial1 at/1
Marks the attendance of all the students in group-tutorial1 as present.
3.7. Graph Students: graph
Graph students attendance whose names contain any of the given keywords.
Format: graph KEYWORD [MORE_KEYWORDS]
Graph students attendance tagged with specified tag.
Format: graph t/TAG [MORE_TAGS]
Examples:
-
graph John
Returns attendance graph ofjohnandJohn Doe -
graph Betsy Tim John
Returns attendance graph of any student having namesBetsy,Tim, orJohn -
graph t/students
Returns attendance graph of students tagged witht/students -
graph t/students t/colleagues
Returns attendance graph of students tagged witht/studentsort/colleagues
3.8. Schedule events: schedule
Schedules an event for the user to keep track of.
Format: schedule event/EVENT_NAME date/DATE start/TIME_START end/TIME_END [descr/DESCRIPTION]
Examples:
-
schedule event/CS2103 Tutorial 11 date/14-11-2018 start/13:00 end/14:00 descr/Final Product Demo
Schedules an event namedCS2103 Tutorial 11on 14-11-2018 from 1:00pm to 2:00pm.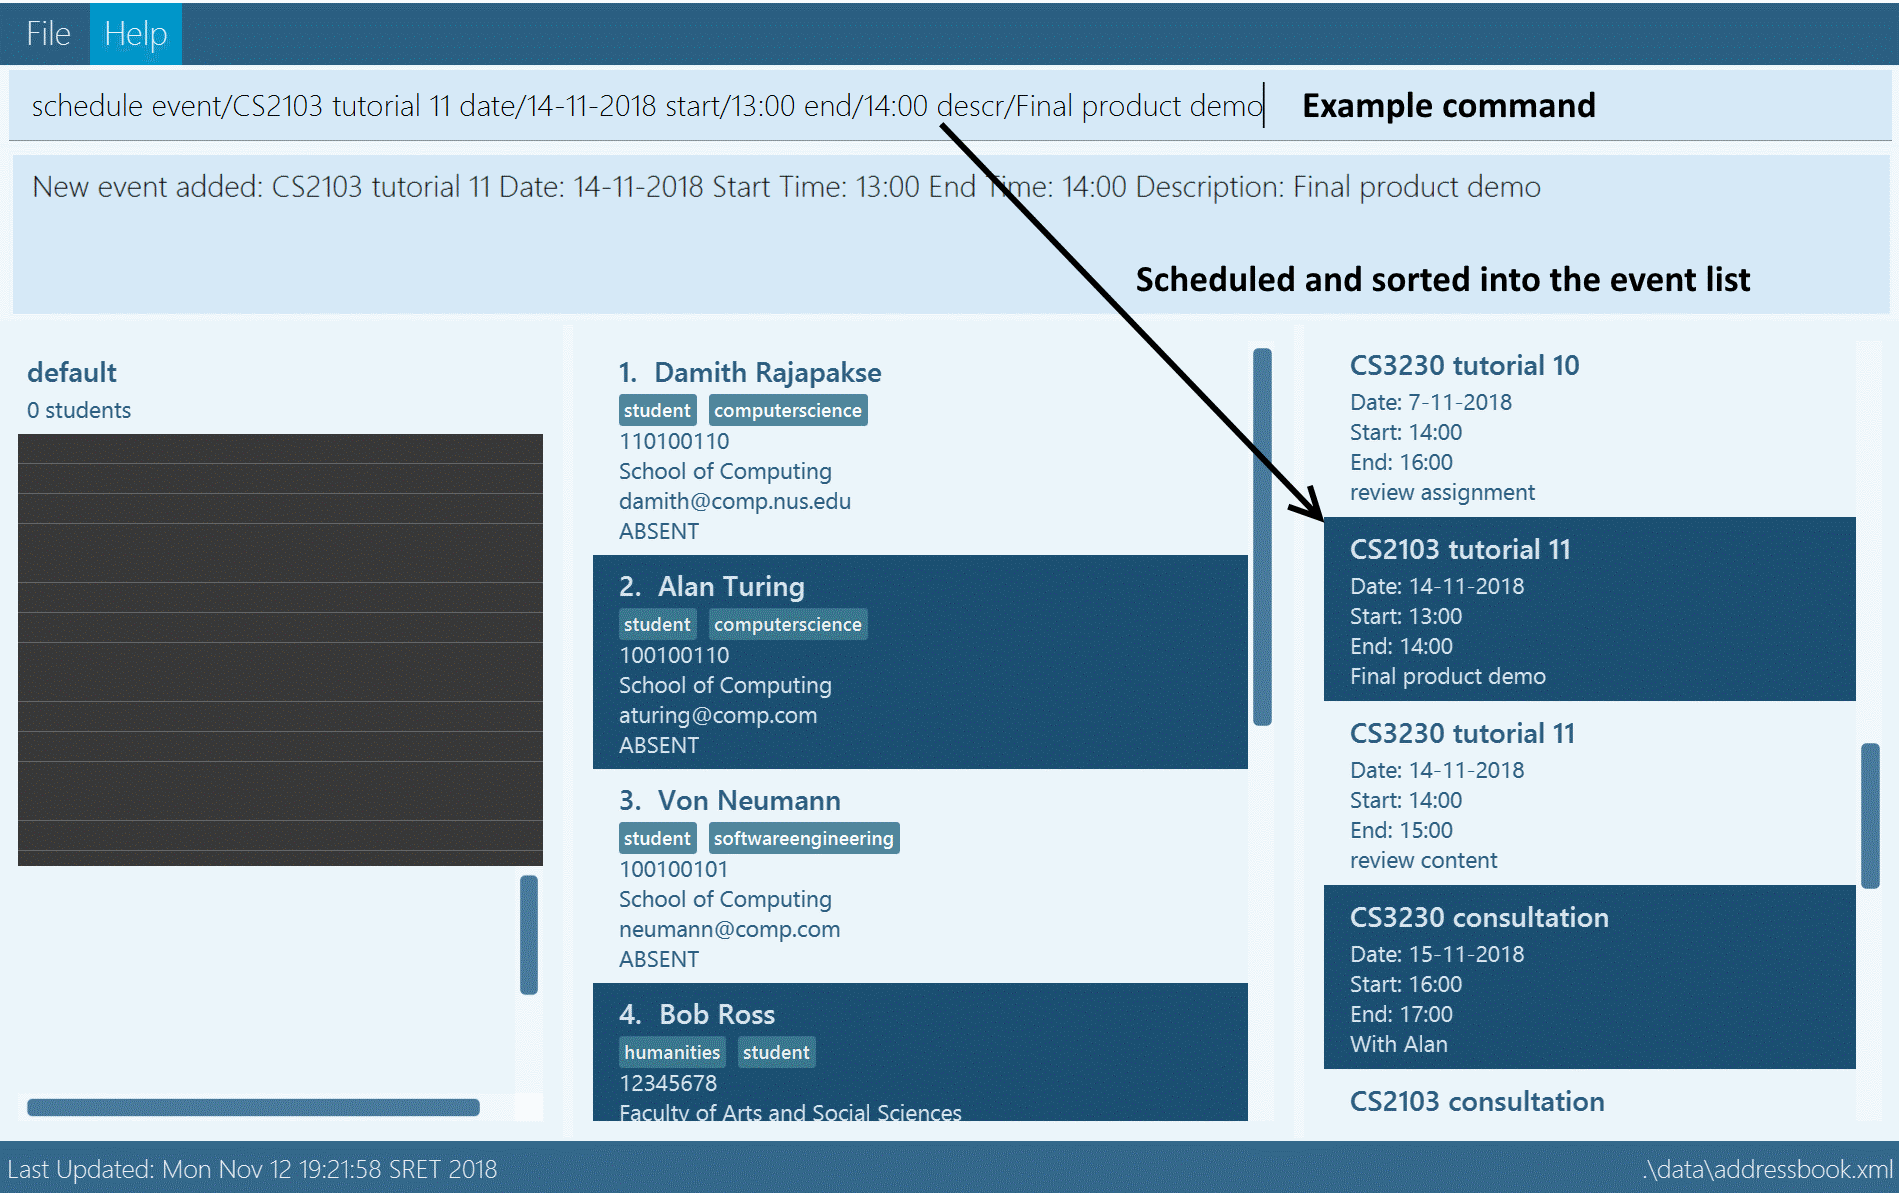
3.9. Cancel event: cancel
Cancels an event already in the calendar.
Format: cancel event/EVENT_NAME date/DATE start/TIME_START end/TIME_END
Examples:
-
cancel event/CS2103 Consultation date/24-9-2019 start/18:00 end/19:00
Cancels the event namedCS2103 Consultationon 24-9-2019 from 6:00pm to 7:00pm that is present in the calendar.
3.10. Locating students by name/tag: find
Finds students whose names contain any of the given keywords.
Format: find KEYWORD [MORE_KEYWORDS]
Finds students tagged with specified tag.
Format: find t/TAG [MORE_TAGS]
Examples:
-
find John
ReturnsjohnandJohn Doe -
find Betsy Tim John
Returns any student having namesBetsy,Tim, orJohn -
find t/students
Returns students tagged witht/students -
find t/students t/colleagues
Returns students tagged witht/studentsort/colleagues
3.11. Group: group
A Group represents a group of Students in the app. Some commands accept Groups as an alternative to INDEX as a parameter to perform batch operations instead of individual operations.
3.11.1. Group Creation
Format: group [g/grpName] find t/TAGNAME or group [g/grpName] find KEYWORD
This creates a Group containing the Students returned by the find command with the supplied arguments.
group find t/friends will find all students in the Address Book tagged with "friends" and add them to a group.
-
[v2.0]
group index INDEX…will take a series of indices as arguments and group the students represented by the indices
// assume that the current display shows {Adam, Bob, Charles, Dylan}
group g/grp1 index 1 4
// g/grp1 will then contain {Adam, Dylan} since Adam is index 1 and Dylan is index 4 on the currently displayed list
3.11.2. Named Groups
Groups can be named by using the prefix g/GROUPNAME. If not specified, the name of the created Group will default to "g/default",
i.e. group find t/friends is equivalent to group g/default find t/friends
E.g. group g/myGroupName find t/friends will add the Students tagged with "friends" to a Group called "myGroupName"
Note: Group names must be alphanumeric and not contain spaces.
3.11.3. Manipulating Groups
Groups are able to be manipulated to expand or contract the selection to fit the users needs
-
joinwill take two groups as arguments and create a new group that contains students from either of the groups
// assume that g/grp1 contains {Adam, Bob}
// g/grp2 contains {Bob, Charles}
group g/grp3 join g/grp1 g/grp2
// g/grp3 will contain {Adam, Bob, Charles}-
andwill take two groups as arguments and create a new group that contains only students that are in both of the groups
// assume that g/grp1 contains {Adam, Bob}
// g/grp2 contains {Bob, Charles}
group g/grp3 and g/grp1 g/grp2
// g/grp3 will contain {Bob} since Bob is the only student in g/grp1 and g/grp2-
[v2.0]
complementwill take one groups as an argument and create a new group that contains every student except those in the supplied group
// assume that there are a total of 3 entries, {Adam, Bob, Charles}
// and g/grp1 contains {Bob}
group g/grp2 complement g/grp1
// g/grp2 will then contain {Adam, Charles} since Bob is in g/grp1 and will thus be excluded
General format: group [g/DEST_GROUP] <operation> g/OPERANDGROUP1 [g/OPERANDGROUP2]
Note: The first operand is compulsory while the second operand is optional and will default to "g/default"
3.11.4. Displaying Groups
The Students in a Group can be shown in the GUI with the following command:
group [g/GROUPTOBESHOWN] show
3.11.5. Interactions with undo and redo
Due to the way undo and redo are implemented, Groups that are changed as a result of these commands will not behave as expected, the students that are changed will be removed from the Group.
For example,
// g/grp1 contains {Adam, Bob}
delete 1 // delete Adam
// g/grp1 will now only contain {Bob}
undo // restores Adam to the addressbook
// g/grp1 will not be restored to the previous state and will still only contain {Bob}
3.11.6. Reference
(Implemented as of 1.4)
-
group [g/grp1] find <KEYWORD|t/TAG…>— finds persons matching KEYWORD in their name or matching specified tags and group under grp1 -
group [g/grp1] join g/grp2 g/grp3— groups the union of grp2 and grp3 under grp1 -
group [g/grp1] and g/grp2 g/grp3— groups the intersection of grp2 and grp3 under grp1 -
group [g/grp1] show— displays students from grp1 in the GUI
Notes:
-
g/grp1 defaults to default if omitted
Examples:
-
group find t/friends— adds all students with tag t/friends under g/default -
group g/abc find t/colleagues— groups all students with tag t/colleagues under g/abc -
group join g/a g/b— groups students in either g/a or g/b under g/default (union of a and b) -
group and g/a g/b— groups students in both g/a and g/b under g/default (intersection of a and b) -
group g/test show— shows students grouped under g/test in the GUI
3.12. Tag Students: tag
Adds, sets or deletes tags from students (by index or by name).
Format: tag add|set|del index|g/group [t/tags…]
Examples:
tag add 1 t/tut1 // Adds the tag "tut1" to first person in list
tag set 1 t/tut1 // Removes all tags from first person in list and adds tag "tut1"
tag del 1 t/tut1 // Removes the tag "tut1" to first person in list (does not do anything if supplied tag is not found)

tag add g/students t/cs2103 // Adds the tag "cs2103" to all students in the group named "students"
Note:
-
The command accepts any number of tags (including 0), using
tag setwith no tags supplied will clear all tags -
The command will not fail even if the supplied tag is already present in the case of
tag addandtag set -
The command will not fail even if the supplied tag is absent in the case of
tag delete -
The command will still display a success message if the above cases occur
3.13. Deleting a student : delete
Deletes the specified student from the address book.
Format: delete INDEX
Examples:
-
list
delete 2
Deletes the 2nd student in the address book. -
find Betsy
delete 1
Deletes the 1st student in the results of thefindcommand.
3.14. Selecting a student : select
Selects the student identified by the index number used in the displayed student list.
Format: select INDEX
Examples:
-
list
select 2
Selects the 2nd student in the address book. -
find Betsy
select 1
Selects the 1st student in the results of thefindcommand.
3.15. Listing entered commands : history
Lists all the commands that you have entered in reverse chronological order.
Format: history
|
Pressing the ↑ and ↓ arrows will display the previous and next input respectively in the command box. |
3.16. Undoing previous command : undo
Restores the address book and/or calendar to the state before the previous undoable command was executed.
Format: undo
|
Undoable commands: those commands that modify the address book’s content ( |
Examples:
-
delete 1
list
undo(reverses thedelete 1command) -
select 1
list
undo
Theundocommand fails as there are no undoable commands executed previously. -
delete 1
schedule event/CS2103 Consultation date/24-9-2019 start/18:00 end/19:00
undo(reverses theschedule event/CS2103 Consultation date/24-9-2019 start/18:00 end/19:00command)
undo(reverses thedelete 1command)
3.17. Redoing the previously undone command : redo
Reverses the most recent undo command.
Format: redo
Examples:
-
delete 1
undo(reverses thedelete 1command)
redo(reapplies thedelete 1command) -
delete 1
redo
Theredocommand fails as there are noundocommands executed previously. -
delete 1
clear
undo(reverses theclearcommand)
undo(reverses thedelete 1command)
redo(reapplies thedelete 1command)
redo(reapplies theclearcommand)
3.18. Clearing all entries : clear
Clears all entries from the address book and calendar.
Format: clear
3.19. Exiting the program : exit
Exits the program.
Format: exit
3.20. Saving the data
Address book data are saved in the hard disk automatically after any command that changes the data.
There is no need to save manually.
4. FAQ
Q: How do I transfer my data to another Computer?
A: Install the app in the other computer and overwrite the empty data file it creates with the file that contains the data of your previous ConTAct folder.
5. Command Summary
-
Add
add n/NAME sn/STUDENT_NUMBER e/EMAIL f/FACULTY [t/TAG]…
e.g.add n/James Ho sn/A22224444 e/jamesho@example.com f/School of Computing t/student t/computerscience -
Clear :
clear -
Delete :
delete INDEX
e.g.delete 3 -
Edit :
edit INDEX [n/NAME] [sn/STUDENT_NUMBER] [e/EMAIL] [f/FACULTY] [t/TAG]…
e.g.edit 2 n/James Lee e/jameslee@example.com -
Attendance :
attendance INDEX_NUMBER at/ATTENDANCEe.g.attendance 1 at/1orattendance g/tutorial1 at/1 -
Schedule :
schedule event/EVENT_NAME date/DATE start/TIME_START end/TIME_END descr/DESCRIPTION
e.gschedule event/CS2103-Tutorial-W13 date/22-3-2018 start/16:00 end/18:00 descr/Product demo -
Cancel :
cancel event/EVENT_NAME date/DATE start/TIME_START end/TIME_END
e.g.cancel event/CS2103 Consultation date/24-9-2019 start/18:00 end/19:00 -
Email :
email GROUP_NAME [MORE_GROUP_NAMES] e.g. `email CS2103-Tutorial-W13 -
Find :
find KEYWORD [MORE_KEYWORDS]
e.g.find James Jake -
List :
list -
Help :
help -
Select :
select INDEX
e.g.select 2 -
History :
history -
Undo :
undo -
Redo :
redo -
Tag :
tag add|set|del index|g/group [t/tags…] -
Group :
group [g/m1] …-
find <KEYWORD|t/TAG…>— finds persons matching KEYWORD in their name or matching specified tags and group under m1 -
join g/m2 g/m3— sets m1 to be the union of m2 and m3 -
and g/m2 g/m3— sets m1 to be the intersection of m2 and m3 -
show— displays students from m1 in the GUI
-